FAQs
-
-
Everyday Cleaning
The safest way to clean your acrylic tub is with warm water and a small amount of mild dish soap.
Use a soft cloth or sponge—this is usually all you need to keep it looking great.
What to Avoid
Never use abrasive cleaners (like powders or rough scrubbing pads). These can scratch the smooth acrylic surface.
Stay away from strong chemicals, including solvent-based or acidic cleaners. Always check product labels: if they say "not for acrylic" or "not for plastics," don’t use them.
Tougher Stains or Marks
If you get a stubborn mark or scuff, a Mr. Clean Magic Eraser works well without damaging the surface.
Restoring Shine
You can occasionally use a high-quality automotive wax made for plastic surfaces to restore some of the original shine.
Follow the instructions on the product carefully.
Important: Never apply wax to the floor of the tub. It can make it slippery and unsafe.
Repairs
If your tub ever needs a repair, contact a qualified acrylic professional. Trying to fix it yourself could cause more damage.
-
Mortar = Strong, Long-Lasting Support
Mortar cures into a solid, rock-hard base that adheres to many surfaces.
It provides even weight distribution across the floor, so your tub is fully supported.
This prevents shifting, sagging, or cracking of the tub over time.
Why Not Foam?
Foam may seem easier to use, but it cannot handle long-term weight and pressure.
Over time, foam compresses, causing the tub to sag or shift.
Foam can also absorb moisture, which may lead to mold, mildew, and weakened support.
The Bottom Line
Using mortar ensures your tub stays stable, durable, and safe for years to come.
It protects against cracks, leaks, and structural damage that can happen with weaker materials.
-
Many times a damaged bathtub can be repaired.
If the acrylic has a clean crack or chip and no damage to the fiberglassing layer under the acrylic, it is usually repairable.
Because there are multiple factors to consider in a repair, it is always best to send your lot number and a photo of the damage to warranty@jettacorp.com.

Example of repairable damage

Example of non-repairable damage
-
We recommend using a diamond-tip hole saw for drilling faucet holes.
Tips for Best Results:
Start your drill in the reverse position to help score the surface and minimize chipping.
Once the hole is started, you can switch the drill to the forward position to complete the cut.
-
Jetta’s toe-tap drains include an adjustment screw that lets you fine-tune how the stopper works.
How to Access the Adjustment Screw
Remove the stopper (you do not need to remove the entire drain assembly).
Flip the stopper over—you’ll see a hexagon-shaped plastic piece with the screw inside.
How to Adjust the Screw
Use firm pressure to twist the hexagon piece:
Turn left (shorten the screw): if your drain is losing water and not sealing tightly.
Turn right (lengthen the screw): if your drain is not staying closed.
💡 Pro Tip: Before adjusting, check the stopper for hair or debris buildup. Cleaning it out often restores proper function without needing an adjustment.
Replacement parts can be purchased on the manufacturer's website.
-
Jetta’s Partner Portal is a secure website created for our distribution customers.
What You’ll Find Inside
Access to your order history
Your confidential pricing
Marketing support documents and resources
How It Differs From Jetta University
Your Partner Portal login is separate from your Jetta University eLearning credentials.
This separation keeps your information secure:
Jetta University (eLearning) is hosted on a third-party platform and allows self-enrollment.
The Partner Portal requires a Jetta team member to verify your identity and qualify you for access.
Why the Extra Step?
Because your security is very important, we make sure only qualified distribution partners gain access to these protected tools.
-
Jetta University is Jetta’s eLearning platform, designed exclusively for our wholesale partners.
Who It’s For
Showroom Managers and Associates
Inside and Outside Sales Consultants
Support staff
What You’ll Learn
The basics of bathtubs and installation styles
The Jetta brand story and product range
Our manufacturing process and commitment to quality
How to Enroll
Log into your Partner Portal.
Select “Access Jetta University.”
Follow the instructions to create your separate Jetta University login.
Important to Know
Your Jetta University login is not the same as your Partner Portal login.
The Partner Portal provides access to confidential pricing, order history, and documents.
Jetta University is focused only on training and education.
-
-
-
If your Affinity combo system isn’t running, the issue may be with the component connections. Use this checklist to confirm each part is plugged in correctly:
Check out this helpful diagram
- Pump Connection
The black/silver metal pump pigtail plugs into the small black box.
The small black box must be plugged into its own 20-amp dedicated GFI outlet.
- Blower Connection
The gray hard-plastic blower also needs its own 20-amp dedicated GFI outlet.
The black cable connection on the back of the blower should be clearly labeled.
- Light Cable
The gray light cable plugs into the small black box on the furthest left-hand plug (away from the gray metal face).
- Keypad Cable
The keypad cable connects to a small 2-inch adapter.
The other end of the adapter plugs into a Y-cable.
The Y-cable connects:
To the small black box (right-hand plug, closest to the gray metal face)
And to the back of the blower (at the labeled black cable connection).
-
-
-
If the light in your air or combo tub isn’t turning on, here’s what to check:
1. Remember the Light is Controlled by the Keypad
On air and combo tubs, the keypad operates the light.
If the light isn’t responding, it may be a keypad or connection issue.
2. Check the Cable Connection
Open the access panel to reach the blower.
Locate the gray cable coming from the back of the light cup.
Make sure it is firmly plugged into the middle outlet on the back of the blower.
3. If the Light Still Doesn’t Work
Confirm the connection is secure and not loose.
If the light still won’t come on, please contact Jetta Customer Support at 1-800-288-7771 for additional troubleshooting.
-
This is completely normal! Jetta air tubs come standard with three operating modes, and each mode changes how the blower runs:
Continuous Mode (press the blower button once) → The blower runs at a steady, even speed.
Pulse Mode (press the blower button twice) → The blower cycles between stronger and softer air pressure.
Wave Mode (press the blower button three times) → The blower gradually increases and decreases speed in a wave-like pattern.
So if your blower doesn’t feel like it’s running evenly, it’s likely in Pulse or Wave Mode. Just press the button again to switch modes until you find the setting you prefer.
-
Don’t worry—this is completely normal!
Jetta air tubs come equipped with an automatic purge (dry) cycle. This feature helps keep your tub clean and sanitary by:
Clearing water from the injector lines
Drying the system to prevent buildup
How It Works
About 20 minutes after you finish your bath, the purge cycle will start automatically.
The blower will run for about 2 minutes and then shut off on its own.
This built-in cycle ensures your tub stays clean, dry, and ready for your next use.
💡 Pro Tip: If you hear your blower turn on later, it doesn’t mean you accidentally left the tub running—it’s just the purge cycle doing its job!
-
Yes. Even if you don’t turn on the air blower during your bath, water still enters the air injector lines. If the lines aren’t purged, that water can remain inside and lead to buildup over time.
What To Do
-
After your bath, press the blower button once to turn it on, then press it again to turn it back off.
-
This action will activate the automatic purge cycle, which will:
Start 20 minutes later
Run for about 2 minutes
Leave your lines clean and dry
-
-
The speed adjustment is located on your keypad. Press and hold the +/– key to increase or decrease the speed of the bubbles. Holding the button will cause the speed to cycle from the highest to the lowest setting and back up. Remove your finger from the button when you reach the desired speed. The speed will reset to the maximum each time you turn on the blower.
-
If your air blower isn’t starting, here are a few things to check:
1. Confirm Power Supply
-
Look at your keypad. If the red light is on, the blower is receiving power.
-
If there’s no red light, the blower may not be getting electricity.
2. Test the Outlet (GFCI)
-
Plug in another device (like a lamp or phone charger) into the GFCI outlet under the tub to see if the outlet is working.
-
If the outlet doesn’t work, try pressing the reset button on the GFCI.
-
If it still doesn’t work, you may need an electrician to check the circuit.
3. Keypad Communication Issue
-
If your blower has power but the red light is not on, it could be a communication problem between the keypad and the blower.
4. Need More Help?
-
Please contact Jetta Customer Support at 1-800-288-7771. Our team can help troubleshoot further.
-
-
-
-
Yes—on some models. Certain Jetta freestanding tubs are designed to allow deck-mounted faucets.
Not all freestanding tubs are suitable for this installation.
To confirm if your model is compatible, see this list: Freestanding deck mount faucet options
-
Please follow these steps:
-
Check the Cap Gasket: Ensure the cap gasket is installed correctly. For reference, see the images showing the correct orientation.
-
Test the Drain Basket Gasket: Use a rubber stopper to test the drain basket gasket. If the bathtub is unable to hold water with the rubber stopper in place, this indicates an installation issue, and it may be a warranty issue with your installer.
Note: If the drain was not installed according to the manufacturer's instructions, unfortunately, this would void the manufacturer's warranty.
-
Still Losing Water?: If the tub continues to lose water even after testing with the rubber stopper, please contact warranty@jettacorp.com.


For additional support, please reach out to sales@jettacorp.com.
-
-
-
-
Your new floating remote must be paired with the controller before use.
Pairing Steps
Place the remote near the unplugged control box.
Press and hold the power button on the remote.
While holding the button, plug in the bath controller.
Watch the LED light on the controller:
It will flash at first.
When it becomes steady, the remote is successfully paired.
Release the power button.
Plug the blower into the controller.
Enjoy your remote!
Need Extra Help?
Watch this helpful video for detailed instructions on pairing your floating remote to the blue control box.
-
Does the Location of the Freestanding Air Blower Need a Vent?
Yes. An air vent is required for the blower to function properly.
The vent allows the blower to pull in enough air to operate efficiently.
It should be at least 2” x 4” in size (or larger).
Make sure the vent remains clear and unobstructed at all times.
-
Yes. It’s important to leave an access opening so the blower and electrical components can be serviced if needed.
The access opening should be at least 22” x 18” in size.
This ensures there is enough room to reach and work on all electrical components of the system.
Why It Matters
Without proper access, repairs or maintenance may be difficult—or even impossible—without removing the tub. Leaving access now helps protect your investment and makes future service much easier. -
To connect the blower hose to the blower:
Slide the blower hose over the air output fitting on the blower.
Secure the connection using one 1-inch hose clamp.
Tighten the clamp so the hose is snug and airtight, but be careful not to overtighten.
Tip: A properly clamped hose ensures smooth airflow and prevents leaks.
-
How Do I Secure the Blower in Place for My Freestanding Tub?
Your blower is designed with four mounting points to keep it stable and secure.
Where to Mount the Blower
You can mount it to a wood surface, such as:
The floor of an attic or cabinet
A sturdy shelf inside a closet
Choose a noise-dampening location (like an enclosed cabinet, closet, or insulated space) to reduce vibration and operating sound.
How to Mount It
Use the four mounting points on the blower to attach it firmly to the wood surface.
Ensure the surface is solid and can support the blower’s weight without shifting.
Important: Do Not Mount Vertically
The blower should never be mounted upright on a sheetrock wall.
Mounting it this way can cause vibration, noise, or damage.
-
Can I Order Additional or Replacement Electrical Cables for My Tub?
Yes. You can order additional or replacement cables to connect the keypad cable to the blower.
How to Order
Through a distributor: request Jetta part number 01-31-0514.
If you did not purchase through a distributor: contact Jetta Customer Support directly at 1-800-288-7771.
-
Can the Blower Hose Be Used to Span the Distance Between the Tub and the Blower?
Yes. Your tub comes with a 6-foot section of blower hose already attached to the tub. This factory connection should not be removed.
If You Need a Longer Hose
Additional lengths of blower hose can be purchased from the distributor where you bought your tub.
To extend the hose:
-
-
Use a small section of flex pipe to connect the new hose to the existing one.
-
Secure both ends with two hose clamps for a tight, reliable seal.
-
-
-
Can PVC Be Used to Connect the Blower to the Tub?
Yes. PVC can be used to extend the connection between the blower and the tub, but the factory-installed blower hose must remain in place.
Factory Hose Connection
Each tub comes with a 6-foot blower hose already attached.
This connection should not be removed.
How to Connect PVC
Locate one of the flat spots in the blower hose and cut the hose in the center of that spot.
Use this cut end to connect the hose to the air output fitting on the blower.
For the remaining distance between the blower and the tub, you may use 1-inch diameter PVC (rigid or flexible) pipe.
Airflow & Fittings
When making turns, avoid sharp 90° angles.
Instead, use two 45° fittings to reduce restriction and keep airflow smooth.
Always use clamps to secure the blower hose at all connection points.
-
Can I Drill a Hole for the Blower Hose in the Back of the Tub If It Will Be Installed on a Slab Foundation?
Yes, but proceed with caution. There is space to drill a hole, but it must be done carefully to avoid damaging the tub or plumbing.
Important Safety Notes
Do not drill under the integrated linear overflow. Doing so will make the overflow unusable.
Jetta Corporation is not responsible for any damage to air plumbing caused during drilling.
How to Drill the Hole
Use a 2 ½-inch diameter diamond-tip hole saw to reduce the risk of chipping.
Drill slowly and carefully.
As soon as the saw clears the acrylic surface, stop immediately to avoid cutting into or damaging the air plumbing.
-
How Far From the Tub Can I Mount the Blower for My Freestanding Air Bath?
The blower can be mounted away from the tub, but placement is important for proper performance.
Distance & Placement
The blower should be mounted within 15 feet of the tub.
Do not mount the blower in the cavity directly under the bathtub.
Choose a location with:
Some airflow (not an enclosed, airtight space)
An ambient temperature of about 72°F (room temperature)
Airflow & Hose Routing
Keep directional changes to fewer than 6 total bends.
If using PVC pipe, avoid sharp turns:
Instead of a single 90° elbow, use two 45° turns to reduce restriction and allow smooth airflow.
-
If your floating remote is slow to respond, it’s probably time to replace the batteries.
What You’ll Need
A small flathead screwdriver
A small Phillips screwdriver
Replacement batteries (check your remote’s specifications)
Steps to Replace the Batteries
Use the flathead screwdriver to open the remote casing carefully.
Remove the screws with the Phillips screwdriver.
Take out the old batteries and insert the new ones.
Reseal the remote casing tightly to maintain its watertight seal.
Extra Help
Watch this helpful video for detailed instructions to successfully access the batteries, replace them, and reseal the encasement for use.
-
How Can I Program or Reprogram the Controls for My Floating Remote?
Your floating remote can be programmed or reprogrammed quickly to customize your bathing experience.
Program the Control Box
The remote communicates with the control box inside your tub system.
You’ll first need to program the control box to set it up.
2. Follow the Step-by-Step Video
We’ve created a helpful video that walks you through the exact process.
3. Use Your Remote
Once the control box is successfully programmed, your floating remote will be ready to use.
-
The blower measures approximately:
10" long
9" wide
7" tall
For full installation instructions see page 12 of the Jetta Installation Manual.
-
-
-
Here is a PDF document with in-depth instructions on replacing your air button.
For additional support, please reach out to sales@jettacorp.com.
-
Possible Cause:
If adjusting your jets doesn’t change the water flow, there may be debris caught inside the jet.
For Classic, Designer, Elite, and the lower jets of Walk-In Tubs
You can remove and clean the jets yourself:-
Rotate the jet body to the left until the tabs clear the openings.You should hear a click.
-
Pull the jet straight out.
-
Clean out any debris.
-
To reinstall: insert the tabs into the openings and turn the jet to the right until you hear a click.
For Affinity and Advantage Tubs
The jets in these models cannot be adjusted or removed for cleaning.
If you are experiencing water flow issues, please contact Jetta Customer Support at 1-800-288-7771 for assistance.
-
-
For Designer and Elite Baths
Yes! These models come standard with rotational jets at the back of the tub. They are designed to disperse water in a whirl pattern, and you can adjust them:To reduce the whirl pattern → Use your finger to move the center of the jet nozzle toward the middle of the jet body.
To increase the whirl pattern → Move the jet nozzle toward the outer ring of the jet body.
For Classic, Walk-In, Advantage, and Affinity Baths
These models do not have rotational jets, so the whirl pattern cannot be adjusted.
-
Are Jetted Tubs Sanitary?
Yes! When properly maintained, jetted tubs are very sanitary and easy to keep clean.Tips for Everyday Use
Always fill your tub with clean, clear water.
Only use water-soluble products (like inSPArations brand available on Amazon)
Avoid salts, oils, or heavy bath additives—they can cause buildup in the lines and even damage the pump.
Monthly Cleaning Routine
To keep your tub’s water lines clean and working at their best, flush them about once a month:Fill the tub with warm water (just above the highest jet).
Add a system cleaner:
We recommend Jetta Clean, which is specially designed to remove biofilm and buildup.
Other options include biofilm removers like Oh Yuk (available on Amazon).
Run the jets for 15–20 minutes so the cleaner circulates through the entire system.
Drain the tub completely.
Rinse and refill with clean water, then run the jets again for a few minutes to flush away any remaining cleaner.
Why This Matters
Over time, natural body oils, soap residue, and other contaminants can collect in the plumbing. Monthly cleaning prevents buildup, keeps the system sanitary, and helps your tub run smoothly.Where to Buy Cleaner
Jetta Clean is available through your local distributor or directly from Jetta:
Call 1-800-288-7771
Email sales@jettacorp.com
-
Why Won’t My Whirlpool Motor Turn On?
If your whirlpool motor isn’t starting, here are the steps to check:
1. Listen for the Relay Click
In a quiet bathroom, press the start button.
If you hear a clicking sound, it means the motor is getting the signal to start, but not receiving power.
2. Reset the Breaker
Go to your home’s electrical panel.
Find the breaker labeled for your bathroom or whirlpool.
Flip it off, then back on to reset it.
3. Check the GFCI Outlet
Open the access panel under the tub and locate the GFCI outlet.
Test the outlet by plugging in something you know works (like a hair dryer or lamp).
If the outlet works → the motor may need service. Please call Jetta at 1-800-288-7771.
If the outlet doesn’t work → press the reset button on the GFCI. If it still doesn’t work, contact an electrician.
Why Won’t My Whirlpool Motor Turn Off?
If your whirlpool motor keeps running and won’t shut off:
1. Stop the Motor Safely
Go to your home’s electrical panel.
Locate the breaker labeled for the whirlpool tub.
Switch the breaker off to stop the motor immediately.
2. Don’t Keep Using the Tub
This problem usually means there’s an issue with the control system or motor communication.
Running the tub further could cause damage or create a safety concern.
3. Get Professional Help
Please contact Jetta Customer Support at 1-800-288-7771.
Our team will guide you through next steps and arrange service if needed.
-
This is normal. The water flow can be adjusted on many Jetta tubs to give you different levels of intensity where you want them.
For Elite, Designer, Classic, and Walk-In Tubs
Each jet has adjustable water volume control.
To change the flow:
Turn the jet to the right → increases water flow (stronger intensity).
Turn the jet to the left → decreases water flow (softer intensity).
This allows you to customize the massage effect for different areas of your body.
For Advantage and Affinity Tubs
These models do not have adjustable jets.
The water flow is fixed and cannot be changed at each jet.
-
Yes. The light inside the plug simply shows that the heater is receiving power.
This does not mean the heater is actively heating.
The heater will only turn on when there is proper water flow in the system.
So if you see the light, it just confirms that the unit is ready—it’s not “always on.”
-
The inline heater only activates when enough water flows through the system.
Troubleshooting Steps:
Check the Jets
Make sure all jets are in the open position.
If jets are closed or partially closed, there may not be enough water flow to trigger the heater.
Understand the Sensor
A water flow sensor controls the heater.
If the sensor does not detect sufficient flow, the heater will not turn on.
Still Not Working?
If all jets are open and the heater still will not activate, please get in touch with Jetta Warranty Support at warranty@jettacorp.com for further assistance.
-
Short Answer: No.
Jetted tubs should always be filled with clean, clear water or water-soluble products only.
Bath salts, oils, and many bubble bath products should be avoided.
Why Not?
Salts can cause corrosion in your tub’s pump and plumbing.
Oils and non-water-soluble products leave a residue in the plumbing or air lines. Over time, that residue can collect biofilm (a buildup of bacteria and grime), which can affect performance and cleanliness.
If You’ve Already Used These Products
Don’t worry—you can still restore your tub.
It’s important to clean and maintain your tub’s plumbing lines regularly to remove residue and prevent buildup.
We recommend following the steps in our Jetta Blog guide to cleaning and maintenance
-
If your tub was manufactured after May of 2008, replacement jet parts can be purchased from www.whirlpooltubparts.net
IMPORTANT NOTE: In May of 2008, we changed our jet design. All jets and jet trim manufactured prior to this date were discontinued by the manufacturer. The following websites may have inventory of these older jet parts/trim:
www.backyardpoolsuperstore.com
Part numbers for these jets and the jet trim are not available, so the photos on the website will need to be matched to your current jet parts on your tub to ensure the proper items are ordered.
-
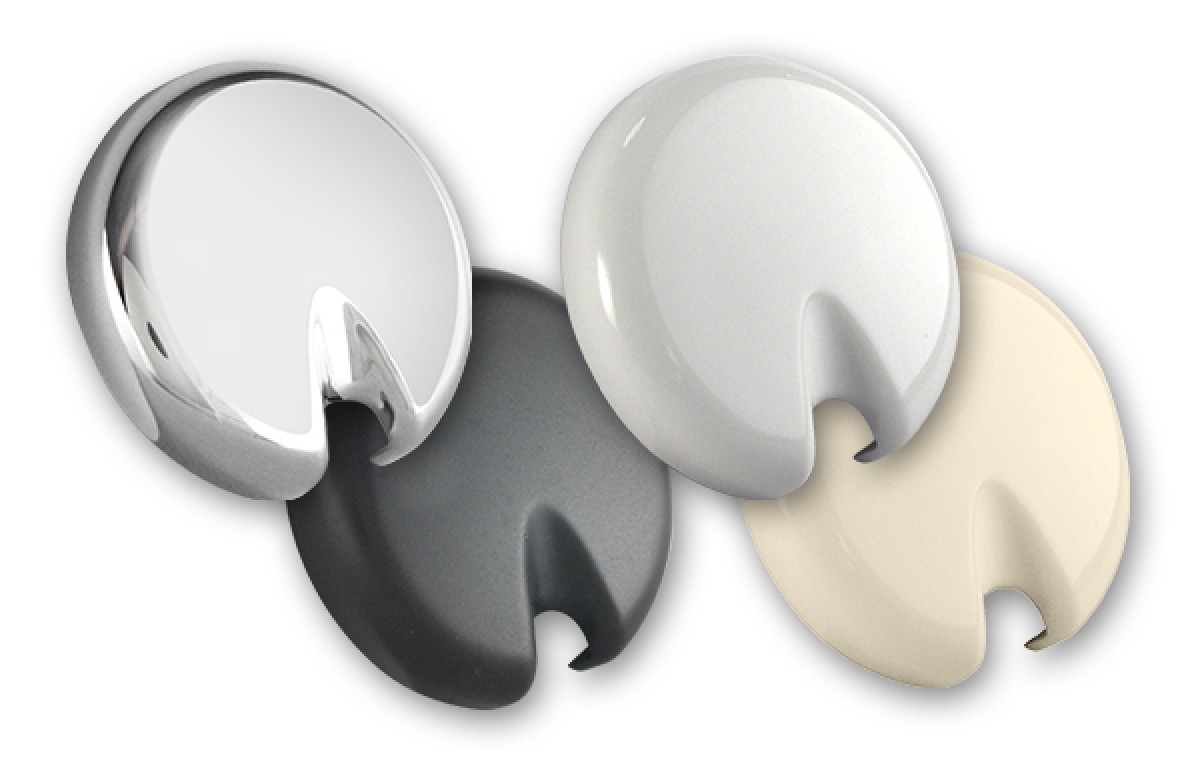
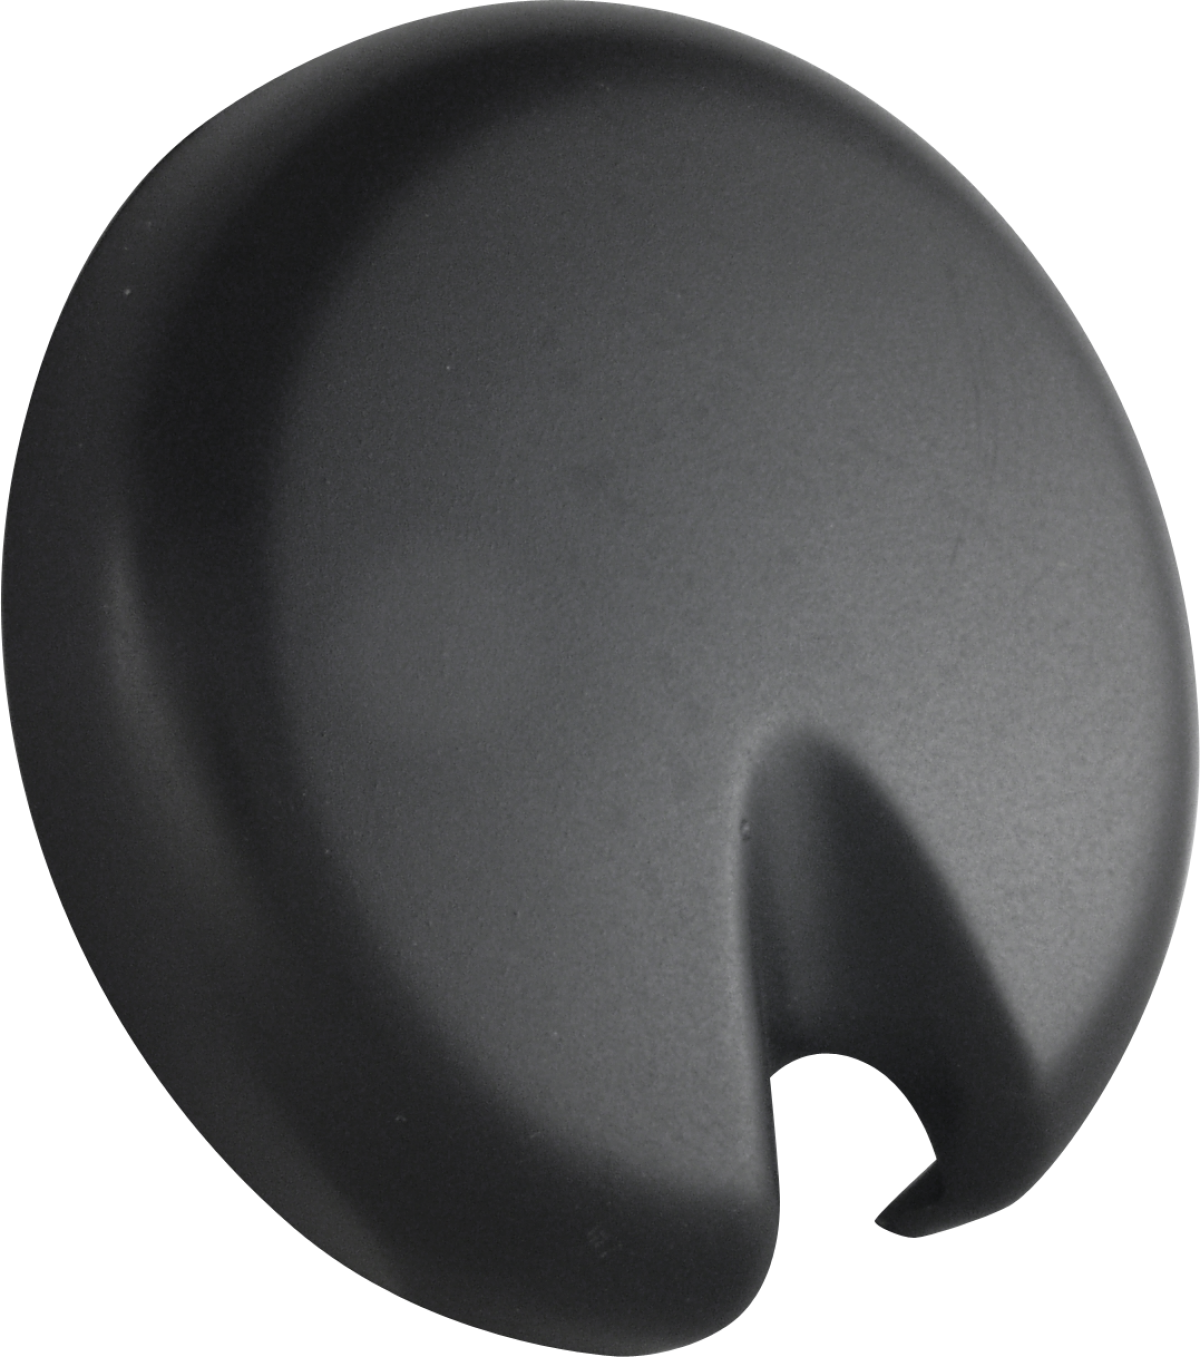
With the ease of a dial, get additional control of the whirlpool flow rates. Increase and decrease the jet pressure of all the jets at the same time with the turn of one control. The control has three settings: low, medium, and high. Comes standard on all Elite and Designer Whirlpool and Combo tubs. Available as an upgrade option on Classic Whirlpool or Combo tubs. Not available for Soaker or Air tubs.
Available in these colors:
- Polished Chrome
- Polished brass
- Oil rubbed bronze
- Satin nickel
- White
- Biscuit
- Bone
- Black
-
Can I Remove My Jets for Cleaning?
Yes!
The jets in Jetta’s Classic, Designer, Elite, and Walk-In tubs can be removed and cleaned easily. In fact, you can even place them in the dishwasher for a thorough cleaning.How to Remove the Jets
Grip the outer ring of the jet.
Turn it counterclockwise past the point of resistance until you hear a click.
Pull the jet straight out to remove it.
How to Reinstall the Jets
Insert the jet body back into the housing.
Turn it clockwise (to the right) until you hear a click.
Make sure it feels snug and secure before using the tub.
Tips:
You can place the jets in the top rack of your dishwasher for safe cleaning.
Always double-check that each jet is reinstalled properly before running the tub.
-